13. Publishing the site
Once you've gotten the template site up and running with your local customizations and added some data in your Airtable base, you're ready to publish your site to the internet.
The easiest way to get your site up and running is with a hosting provider, such as Netlify.
- Sign up for a Netlify account — it's easiest if you log in with GitHub, since you'll eventually link your GitHub site repository to your Netlify account.
- Once in Netlify, click the "Add new site" dropdown and choose "Import an existing project."
- You'll be prompted to log in to GitHub.
- Next, you can choose a repository to build the site from. Choose the development tracker repository that you created.
- Use the following settings:

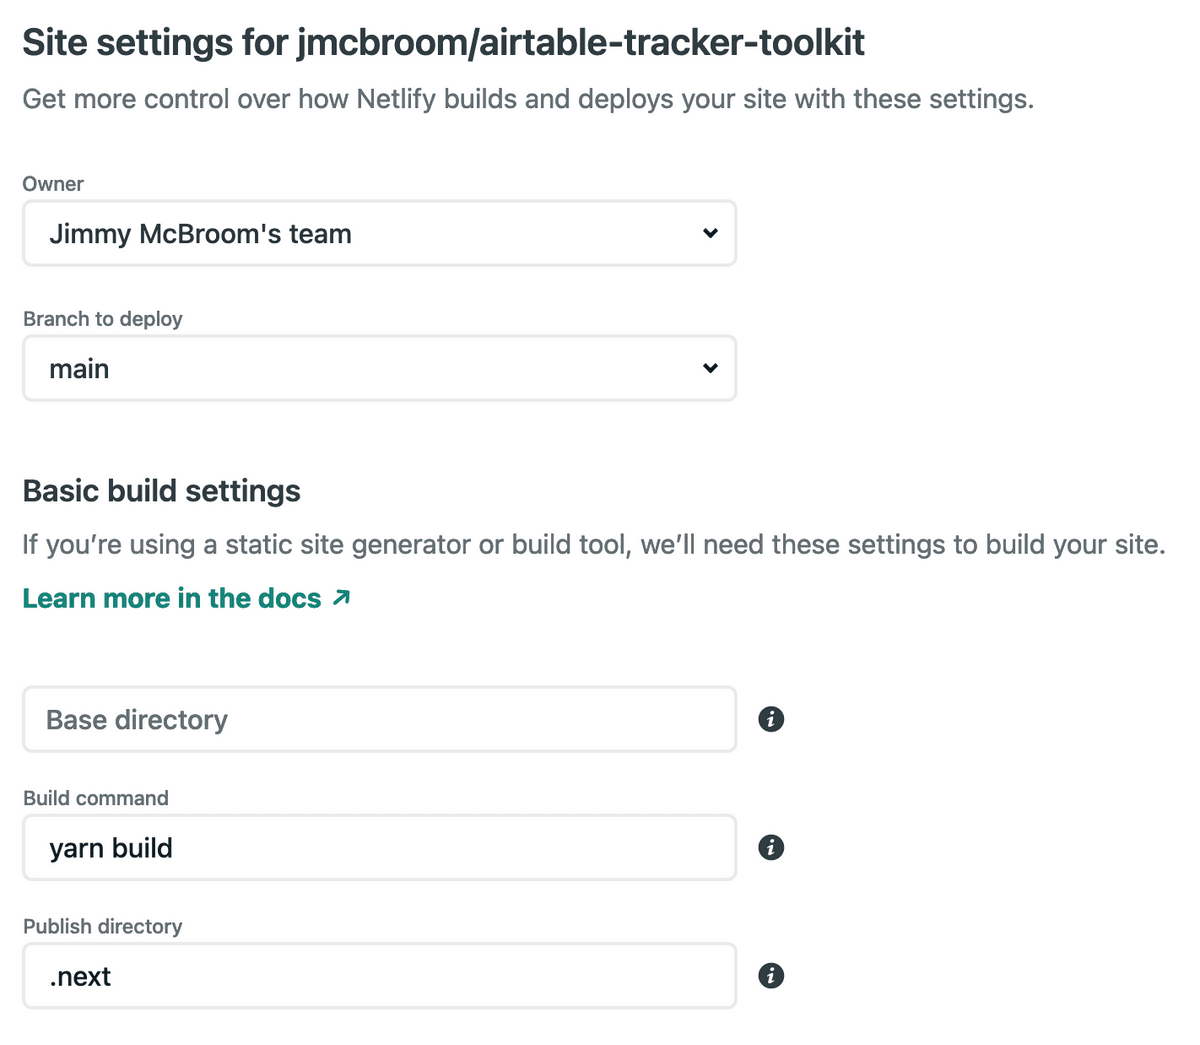
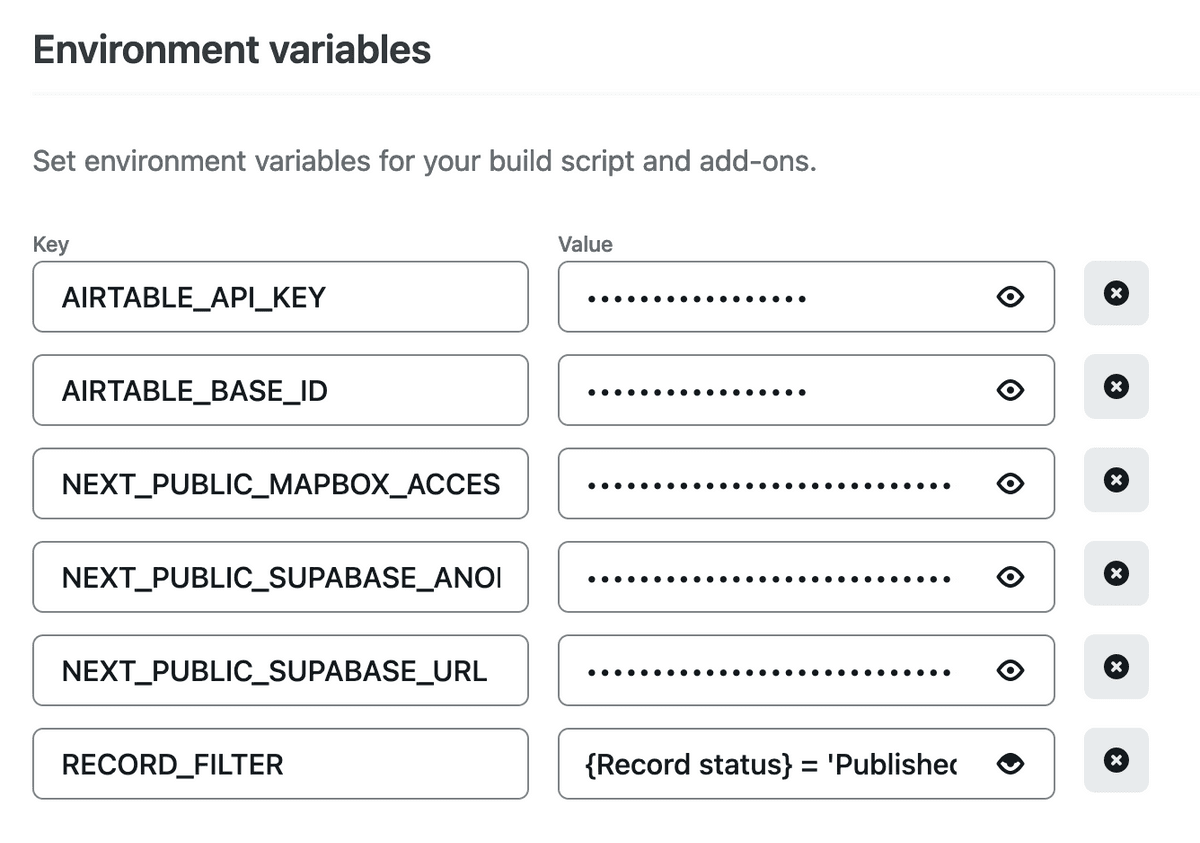
- Under advanced build settings, add your environment variables, from your
.env.development.localfile.
Note: The RECORD_FILTER will be wrapped in double quotes in your .env.development.local file, but you should remove those for the Netlify environment variable. Also, be sure that the quotation marks in the RECORD_FILTER are straight quotes, and not curly quotes.

- Finally, click "Deploy site."
- Netlify will build your site, and deploy it! This process takes a few minutes.
- In Netlify, navigate to domain settings. Here, you can edit the URL of your Netlify site, which is a functional link you could use for your public site. However, you likely want to host the development tracker on your publication’s site. To do this, click "Add custom domain."
- Register your custom domain with Netlify using these instructions.
- Typically, you'll want to keep your existing DNS records, but add a new DNS record on your current domain provider which points to your Netlify site.
- Navigate back to the
toolkit.config.jsfile in VSCode and replace the template site URL with your tracker's custom URL or the public Netlify link here:siteUrl: https://local-development-tracker-toolkit.netlify.app.
- In VSCode, make sure you commit all changes you've made to your site. Follow these instructions for committing changes in VSCode.
- You should now have a live site!
Now that your site is deployed to Netlify, and configured with the correct environment variables there, you can develop it locally with the netlify dev command. This is just like npm run dev, except that it will pull in environment variables from Netlify to build your site.
You can create a live development server, accessible from anywhere, with netlify dev --live and send a live preview URL to someone.
To do this, you'll need to install the Netlify CLI and log into Netlify from the terminal.
Your site needs to be periodically rebuilt and redeployed in order to pull in the latest data from Airtable.
By default, when you change the site's code, on the production branch, Netlify will see that the code has changed and rebuild the site. This will fetch a new copy of the data from Airtable.
However, most of the time you will want to republish your site without changing the code.
There are a few ways that you can manually republish the site and pull in new Airtable data:
- In the Netlify website, navigate to your site page, and click the "Deploys" tab. You can trigger a new deploy by choosing the "Deploy site" option under the "Trigger deploy" dropdown.
- Install the Netlify CLI -- then, from a terminal, in your site's folder, you will be able to run the
netlify deploycommand from a terminal to trigger a new deploy.
- Netlify has a full integration with Zapier. You can use this to rebuild the site on a schedule.
- You can create a build hook in Netlify; this will give you a URL to which you can send an HTTP POST request, in order to trigger a new build/deploy. You can use this hook in a number of situations. For instance, from any terminal, you could send this POST request with:
curl -X POST -d {} https://api.netlify.com/build_hooks/<your_build_hook_id>.
In the next section, you'll learn more about workflows for managing your tracker's data.
Table of contents
- About this guide
- How to use this guide
- What you will need
- Initial questions to ask
- Starting with the data
- Organizing your data: Airtable basics
- Setting up your Airtable base
- Using the Projects table
- Using the Contact Us table
- Using the Tips table
- Setting up the site
- Customizing the site
- Publishing the site
- Managing your development tracker
- Harnessing public engagement and support
- Launching your tracker for the public
- Getting in touch with us